

Integrating your Garden In A Box kit into your outdoor space is easier than you might think. While the Garden Info Sheet included with each kit provides sample Plant by Number design suggestions, your yard’s unique shape might call for a little creative tweaking. Luckily, you don’t need to be a landscape designer to make it work!
Here are 5 simple things to think about when adapting your Garden In A Box design to fit your space:
1. Measure Your Space
Before you start placing plants like puzzle pieces, grab a tape measure and check the length and width of your planting area. Knowing your square footage helps everything fall into place. Then peek at your Garden Info Sheet to see how much space your garden is designed to fill.
2. Think Ahead
It’s important to plan your space based on the fully mature size of the plants in your garden. We want plants to just barely touch when they’ve reached their mature size (think cozy neighbors, not crowded roommates).
Give them room to breathe now, and they’ll fill in beautifully over the next couple of seasons. Your Garden Info Sheet has all the details on mature height and spread to guide you.

3. Height Matters
A little layering goes a long way. If your garden backs up to a structure or fence, place taller plants toward the back and shorter ones up front so everyone gets their moment to shine.
If your garden can be viewed from all sides, think “tall in the middle, shorter around the edges”. This short-to-tall approach allows viewers to easily see and admire your entire garden.
4. Design Aesthetic
Now for the fun part: style.
Want a clean, modern look? Group similar plants together and let repetition do the work (plus pollinators actually prefer visiting plants that are grouped together). Like a more natural, meadow-like feel? Mix things up by spreading colors and textures throughout the space.
And don’t stress: nothing is permanent. If a plant isn’t vibing in its spot (sunlight issues, crowding, or just not the look you want), many can be relocated the following year.
5. Map It Out
Time to bring your ideas to life! Here’s how to visualize your new garden plans:
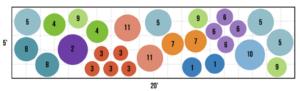
- Sketch your garden on grid paper and use circles to represent plant sizes: big circles for big growers, small circles for the more petite plants.
- Go hands-on: set your plant pots out in the garden bed and play around with arrangements before digging in. This take a little imagination to consider the mature height and spread of your plants, but it’s an easy way to experiment with different arrangements before making a final decision.
Now you’ve got a blueprint, a plan, and a little creative confidence. Whether you’re sketching, shuffling pots, or just imagining your future blooms, these steps help turn your Garden In A Box into a space that feels intentional, beautiful, and uniquely yours.
Happy Planting! 🌼