
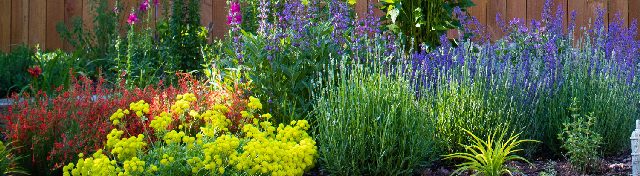
Garden In A Box Additional Planting Information
Choosing a Location
 Check the requirements for each garden (located in your Plant and Care Guide packet). Be sure to consider the microclimate of the space.
- Light: What is the sun exposure? Pay attention to various obstructions that can limit sunlight such as trees and buildings when planning your garden space. Most Garden In A Box Plants will require full-sun exposure. Southern-facing gardens will generally receive more sunlight for longer periods of time if there are no obstructions.
- Water: Once established, Garden In A Box plants require lower water environments than non-xeric perennials. Be sure to avoid areas that receive water through runoff or standing water.
- Size: Be sure to check the square footage covered by each garden and chose your space accordingly. How level is your land?
Before you Plant: Soil Structure and Profile
Regardless of the type of soil you have, it is always a good idea to add an organic material (such as compost) to the soil before planting. The name “Colorado” comes from the Spanish “color rojo” literately meaning “red color” and refers to the land’s red clay-soil. This color is due to high amounts of iron in the soil. Clay soil is actually extremely nutrient-rich; however, because of the density of the soil and nutrients, the nutrients are bound up and not as readily available to the plants.
Soil Testing:
Although definitely not always necessary, it can be useful to test your soil professionally to get a better idea of its content and pH. You can purchase a simple soil testing kit at your local hardware or garden store, or you can get it professionally tested. For more information, click here.
Prepping and Amending Soil
Routine (or yearly) applications of organic material should be considered an essential component of gardening and soil management. This will help improve the water and nutrient holding capacity of any soil type. In Colorado’s clay soil, organic amendments applied to the soil will open up pore space, allowing for improved water infiltration, drainage, and aeration. It also allows the plants’ roots to grow deeper into the soil so that the plant can access a larger supply of water and nutrients. Amendments need to be mixed thoroughly into the soil, and are not to be confused with Mulches, which are left on the surface to decrease evaporation and thwart weeds. (See more information on mulching below.)
Add amendments to the soil about 6-8 inches deep using a pitch fork or rototiller. Warning: If using a rototiller, note that this method may only be used once or twice throughout the entire lifetime of your garden. While they are extremely effective in mixing soil, they will damage the natural structure of the soil. It is better to use a pitchfork and gently rock the amendment into the soil.
Things to Consider When Choosing a Soil Amendment:
- Material that rapidly decomposes, such as grass clippings, leaves and manure will yield quick results, while products that decompose slowly, such as wood chips and peat will provide longer lasting outcomes. For best results, use a combination of materials. Warning: Colorado Mountain Peat is not a good amendment to your perennial or annual garden, as it is too fine and has an extremely high pH level. It is also one of the least sustainable sources of soil amendments.
- With Colorado’s large livestock industry, manure and manure-based compost are readily available. However, manure is often high in salts, which can cause over-salinization. Make sure to use manure with caution! Be sure to watch out for “hot compost,” or unaged/ immature animal-based compost. This can be dangerous for plants, as it has not had time to mature, and often it is difficult to trace the sources and bacteria present in the material.
- Plant-based composts are low in salt. These may be applied at higher application rates, and are often more effective in improving the soil. However, plant-based composts are typically higher in price. We highly recommend using plant-based compost.
So What to Choose?
A healthy mix of organic material from various sources will generally yield the best and longest-lasting results. Consider adding a mix of manure, leaves and compost to your soil before planting. Be cautious when adding compost—over-composting can lead to high concentrations of nitrogen, too much water retention, and over-salinization. Be sure to follow the suggested amount or proportions when adding compost or other organic amendments. Keep in mind that our Garden In A Box Plants have been selected for our Colorado climate and are generally well adapted to more nutrient-poor soils. If in doubt, remember that “less is more” when using amendments for your perennials.
Worm castings (vermiculite) are another extremely beneficial source of material for your soil amendments. Castings can be applied as a top dressing or tilled into a garden at 1 gallon per 13 square feet or 7.5 gallons (1 cubic foot) per 100 square feet. However, vermiculite can be costly but can be extremely effective when added in small amounts to a garden space.
Bio-Comp– (From A1 Organics) is a wood- based compost that has already been broken down. This wood-based compost is very different from wood chips (mulch) and has more plant based organic material to add further nutrients to your soil. Learn more here.
Expanded Shale– An inorganic fertilizer mined from a plant in Golden, CO, which can be used as an alternative to sand to improve your alkaline clay-based soil. The shale is baked to dry out the water, making it lighter. Expanded shale will add lots of aeration and space for roots and microorganisms, and also acts as a pest (rodent) deterrent and attracts beneficial organisms such as earthworms. You may buy Expanded Shale in bags from Harlequin’s Gardens in Boulder, CO.
Compost Tea– Biologically active compost steeped in water. You can buy compost tea at a garden store or create your own compost tea by steeping your compost in water for several weeks. Compost tea makes the benefits of compost go farther, and can even be sprayed on the leaves of plants to suppress foliar diseases. It will also increase the amount of nutrients available to the plant, and speed up the breakdown of toxins in the soil. Using compost tea has even been shown to increase the nutritional quality and improve the flavor of vegetables! Learn more about how to make your own compost tea here.
Planting Instructions
When: If possible, it is best to plant within a week of your pick up (weather permitting, of course.) However, the last frost date for most of the Front Range is May 15 th , and is not until June 30 th in Aspen and other high altitudes. Be sure to check the weather if you are planning on planting before these dates! Check the planting calendar for your specific area here. Pay attention to specific plant details. Most perennials require a soil temperature of at least 35 degrees at night before planting. (Note: Vegetables require much warmer temperatures; see below instructions for vegetable planting information.)
Tip: It is always best to plant in the morning or late afternoon when the sun is less strong to reduce stress on the new plants.
Spacing:
Before you dig, it is always an excellent idea to first lay your plant starts (still in their pots) in the area desired for planting. This will help to determine proper spacing (be sure to refer to your Plant and Care Guide!) and will give you a better idea for your garden’s layout.
To Plant:
- Dig holes the same depth and diameter of the plant.
- To remove the plant from the container, do not pull plant from stem! Instead, squeeze the base of the container to loosen the roots and release the plant.
- Once the plant is out of its container, gently “tickle,” or loosen the root ball, to free most of the roots. Many gardeners suggest “Bare Rooting” as a method of planting, where all the soil from the roots is removed entirely before planting in the ground, in order to better acclimate the roots with the new soil. This method can be helpful, but is not necessary for Garden In A Box Plants.
- Place the plant in the hole, and then fill about 1/3 of the way up with planting mix, top with water, and repeat until the hole is filled with soil to the base of the plant. Though this may seem like too much water, all transplants actually require lots of extra water to relieve the stress of being introduced to a new environment.
Maintaining Your Garden In A Box
Mulch: Mulching is essential in retaining moisture and controlling the soil temperature of your plants and will also reduce weed growth. If mulching with wood chips, spread a layer of about 1-2 inches around (not against) plants. Keep the crowns (the area where the stem of the plant meets the soil) of the plants free of mulch to avoid crown and root rot. Small rocks may also be used as mulch in perennial beds, and will help retain moisture, but will also create a much warmer climate in your garden. Use rocks and other inorganic mulches with caution. Avoid using plastic mulches, as they can make future maintenance and proper soil drainage difficult.
- Organic Mulch:
Make sure not to till in mulch (especially wood-based) into the soil. While it may eventually help with aeration of the soil, tilling mulch into the soil will end up taking away the amount of nitrogen available to the perennials. Shredded bark or wood and straw are all excellent mulches. Advantages of using organic mulches: they are softer and cooler, and will eventually break down and add to the profile of the soil. Wood chips and bark also add fungus that’s beneficial for the soil and the plants. Disadvantages of organic material: they will absorb water when it rains. Wood mulches can float away with major flooding.(Often municipalities and cities will have a tree shredding day a few times per year where they give out wood chips. Check your city’s website to see if your community participates. Additionally, many arborists and tree companies will sell woodchips for a low price. One of our favorite spots to buy Wood Mulch is Mountain High Tree in Lakewood, CO.) - Inorganic Mulch:
Inorganic materials for mulches include gravel, rocks and crushed glass. Benefits: won’t blow away or need to be replaced. Slow incorporation of gravel into the soil can actually add aeration. Disadvantages : warmer soil temperatures, which can spur more weed growth.
Weeding and Weed Barriers: In general, weed barriers can be effective for the first few years of your perennial garden, but will break down and may end up creating more work in the long-term. Common Colorado weeds such as thistle, purslane, dandelions, and sheet grass, are extremely hardy opportunistic plants that may break through the barrier and become even more difficult to remove. Generally, we discourage the use of weed barriers with your Garden In A Box.
The trick to weeding is to be thorough and fastidious! If your garden space gets a thorough weeding regularly, and especially if you are able to catch weeds early, your garden maintenance will be far easier! When weeding it is important to remove the entire root of the weed to discourage its regrowth. It is also extremely important to try to remove weeds before they begin to flower and produce seeds. Helpful weeding tools include a fishtail-weeder, (see image here) for taproot plants such as thistle and dandelions, and a sharp trowel for plants with fibrous roots such as sheet grass and purslane.
Tip: The simplest and most effective way to eradicate weeds is to weed directly after it rains or after watering your garden with a hose. The heavy water will loosen the soil around the weeds, making the plants easier to pull and allowing for easier removal of roots.
Watering: Though these are Xeric plants, all Garden In A Box plants will require more water in their first year to allow for proper establishment of the root system. During the first year, it is a good idea to closely monitor soil moisture and general plant health. There are several different ways to check the soil moisture. The easiest is to stick your finger into the soil directly underneath the plant to check the moisture level. If the soil feels dry a few inches down, you should water the plant thoroughly. Otherwise, wait to water until the soil is dryer (although not completely devoid of moisture.)
You should not water your new plants more than a half hour 3x a week for the first 1-2 months. Make sure to water in the evenings or early in the morning to decrease evaporation. In the second year once plant roots are more established, revert to a much lower watering schedule (approximately every 5-8 days, depending on plant health and temperatures).
Watering during the winter is very important, especially for the first few years. Because Colorado winters are generally dry and if there is little snow, the lack of moisture can damage new plants. However, water only when temperatures are above freezing, during the early part of the day.
When watering, make sure to water the roots of the plants and not the leaves. Drip irrigation is a great way to ensure your plants roots are getting water, but watering by hand with a hose can be just as effective and often even more water-saving. Please refer to your Plant and Care Guide for more specific watering instructions for each plant. We discourage watering with a traditional in-ground sprinkler system. For drip irrigation, we recommend DripWorks.
Taking Care of Your Garden: Make sure to mulch! Follow the instructions in your Plant and Care guide on maintenance for each specific plant. Some plants prefer to be cut back in the fall for the season, and some (such as ornamental grasses) prefer a “spring haircut”. If the garden is well mulched the first year, you should not have to repeat mulching for several years.
Pruning, Pinching, and Dead Heading: Many flowering plants need to be cut back seasonally to allow for new growth. Dead flower heads generally also need to be cut off (dead heading) so that new ones can take their place, and also to discourage the plant from going to seed (or bolting). Always clip off dead stems and leaves from your Garden In A Box plants to encourage future growth. Some flowering perennials such as asters and salvias will need to be periodically pinched back to create a bushier and healthier plant. Use your thumb and forefinger to pinch buds back at the growing tip, and if unsure of how much to pinch, just pinch a few at a time once or twice during late spring. Bushier plants are more productive and will keep the plant from becoming too “leggy”.
Dividing: Once plants are well established, they will need to be divided every few years to prevent overcrowding. To divide plants, use a shovel to remove the entire plant from the garden and place the root ball on a tarp. Then, pry the plant into pieces using two forks. Tease the pieces of the plant apart into different sections, or use a shovel or knife to cut the plant into several pieces. Divide plants in early spring or late fall. Plants should not be divided when they are in bloom or in full growth!
Planting Veggies? Here Are a Few Additional Tips:
Spacing and Planning a Veggie Garden: Planning and space is crucial for the health and production of your vegetable garden. Morning sun is preferable for all crops, as afternoon sun is hotter, and can cause overheating. Choose an area that receives good morning sunlight and receives dappled or partial shade in the afternoons. Make sure to follow the spacing guide in your Plant and Care packet or other plants’ individual planting instructions. Planting crops too close together encourages spreading of disease and makes the plants more susceptible to pests. If you would like to plant sunflowers, hops or other larger flowering plants in your space, make sure to plant them on the north side of the garden so they don’t over-shade your full-sun veggies!
Fertilizing and Amending: Though not necessary, sometimes it can be helpful to add extra nutrients to your soil to encourage plant and crop production. Be sure to use an organic fertilizer on your vegetable plants (you will be eating them!) and make sure to buy a vegetable-specific fertilizer. We highly recommend “Age Old Grow” and Liquid Fish or Seaweed emulsion for plant productivity. Amending the soil in your vegetable garden with eggshells, Bone Meal or Blood meal is a great way to add calcium for plant vitality.
If adding a fertilizer to your plants, make sure to follow the specific directions on the label!! Over-fertilization will lead to increased productivity of the plants’ leaves, but can inhibit vegetable and fruit production and yield. Additionally, DO NOT fertilize any root-crop, such as onions, garlic, beets and carrots. The fertilizer will increase leaf production, but will inhibit the roots’ growth.
Pest Control: There are many different methods of pest control in a vegetable garden plot. As an organic gardener, it is nearly impossible to eradicate all pests, but learning how to control them is a crucial part of your garden’s success. Companion planting for pest control is one of the most effective methods. One of the most famous pest-deterring plants is Marigolds, which are helpful in controlling bean beetles, while Nasturtiums repel aphids. Garlic and Onions (in the allium family) will also help discourage pests. Often it can help to spread out various types of veggies in different areas in your garden to confuse pests.
Another helpful method of pest control is by attracting beneficial insects to your garden. Ladybugs will eat aphids, which can eradicate tomatoes, basil, and leafy greens. Some examples of Ladybug attractors are Asters, Coriander, Dill, and Bee Balm.
If crops are overtaken by pests such as whiteflies or aphids, rub the leaves and stem of the plant (especially the undersides of the leaves, where the pests will generally be found) with a mixture of water and organic soap, such as Dr. Bronner’s. This will make the leaves distasteful to the insects, but will not harm the plant itself. If a certain crop is too infected by pests or disease, it is often best to simply remove the plant from the space to discourage pest or disease spreading. Make sure to discard this plant far away from the rest of the garden.
Maintaining Your Vegetable Garden Space for the Future: Though vegetables are annuals and will not overwinter, there are many different measures you can take to ensure the future health of your plants and garden production throughout the years! Rotating your crops yearly will help your soil’s health. Beans are nitrogen-fixers for the soil, so planting a nutrient-reliant crop such as crops, beets and carrots the next year in the space where the beans were is a great practice. Consider planting a Cover Crop in the fall, after the vegetable garden has been cleared, to inhibit weed growth over the winter season and to maintain soil health.
*Our most important garden tip: Have fun and experiment! Gardening will never be a hard science, and you are guaranteed success with persistence, passion, and a good attitude!
Sustainable Landscaping ReSources:
All of this information was collected with help from the following friends: