
Garden In A Box Kits for Waterwise Yards

Garden In A Box offers professionally designed, waterwise garden kits tailor-made for Colorado yards. Find your garden here.
Q: What does ‘propagation by division’ mean? Is that the best way to propagate plants?
A: Propagation runs the gamut from planting seeds, all the way through to grafting. Some plants are easier than others to propagate and different methods work better with different plants. The technique you select will depend on the type of plant you wish to propagate and the amount of time and effort you want to put into it. The simplest method is planting seeds; division & stem cuttings are fast; and with layering, there are almost no failures.
Plant Propagation
Propagation is the process of creating new plants. If you have ever planted a seed or stuck a stem in water until it forms roots that you stuck it in a pot or planted it in the garden, you have experienced propagation. Some plants are easier than others to propagate and different methods work better with different plants. The technique you select will depend on the type of plant you wish to propagate and the amount of time and effort you want to put into it.
Propagation Methods
I. CUTTINGS
- Stem cuttings The most common propagation method for ornamentals and woody shrubs. Starts with about 3 “ stem dipped in rooting hormone, placed in a container filled with dampened growing medium for a few weeks. Learn more here.
- Leaf cuttings – houseplants, herbaceous plants (perennials, annuals and biennials) & woody plants – a leaf or part of it is placed in the soil with the side closest to the stem pointing down – “great for propagating many plants from one” Learn more here.
- Root cuttings are usually taken from woody plants or perennials, while they are dormant, during November through February, when there is not as much going onin the garden. Usually done outdoors Learn more here.
- With all cuttings, place them in a container with wet paper towels to keep them moist until you get to where you’re going to plant them. Be sure to take more than you think you’ll need, as probably many will not root.
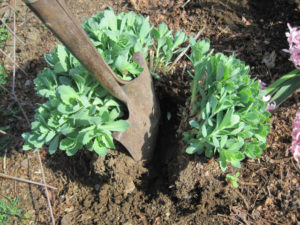
II. DIVISION – Most perennials profit by division (aka root division) as they grow older. Division involves digging up a plant and moving it to another already prepared site. Generally fall flowering perennials are divided in the spring, and summer flowering plants in the fall.
III. LAYERING – effectively clones the plant. Layering is done naturally by many plants through runners, offshoots, or when a stem drops to the ground and gets covered by soil.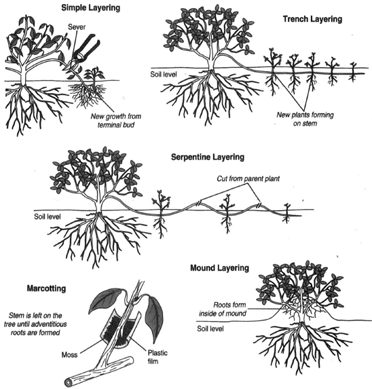
Here are a number of layering techniques:
- Simple layering – stem is wounded, stapled, and covered
- Serpentine layering – the same process as simple layering, but with multiple rooting points
- Tip layering – the tip of a shoot is buried
- Mound (Stool) layering – for shrubs and some tree fruits. Prune plants in fall the about 1 inch above soil surface. In spring, create a mound of soil over the 6-8 inch new shoots. The following fall, remove the soil, prune off and plant the new shoots and their roots.
- Air layering – for trees and plants whose branches cannot be bent to ground level. Leaves are removed, bark wounded, and moist sphagnum moss wrapped and sealed around the area; once roots are developed, the branch is cut and planted.
IV. GRAFTING – the most complex method of propagation; aimed at combining the qualities of both plants, for instance, disease resistance, hardiness, better fruit, and/or more attractive blooms. Most often done with fruit trees, but possible with shrubs and even fruits and vegetables. In grafting, a twig from one plant is attached to the stem of another and becomes a permanent part of the other.
Before you begin, sanitize your tools to reduce the risk of infection. Since you’ll be making an open cut into the plant, you should keep your hands and tools as clean as possible to reduce the chance of an infection entering the plant. Scrub your hands with anti-microbial soap and put on latex gloves.
Basic Propagation Supplies
- Propagation soil, or a mix of potting soil, vermiculite (helps keep the soil moist), and perlite (prevents compaction).
- Propagation chamber – clear container & lid, deep enough for tall seedlings
- Sharp clippers or knife
- Rooting hormone – speeds up the rooting process and protects from disease
- Small pots for rooted cuttings
Tips:
- Sterilize pruning tools in a mixture of 1 part bleach to 9 parts water to prevent transmitting diseases from infected plants to healthy ones.
- Soak the steel parts (shovel blades, rake tongs, and pruning shear blades) for 10 to 30 minutes; rinse in clear water.
- Warning: Bleach solutions are poisonous, so safely dispose of any unused portions. Do not use bleach on plants as it can cause damage to foliage.
Transplanting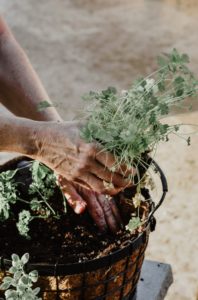

Transplanting is the process of moving plants and runs the gamut of the propagation methods above.
Spring and fall are best for transplanting garden plants. Summer sun and heat are too intense. Choose an overcast day or wait for evening coolness. Avoid moving blooming plants; new plants need to use their energy in producing sturdy roots.
- Dig the hole twice as wide as the root ball but no deeper; the crown needs not to be buried. You can mix in one or two inches of compost or other amendments, but no fertilizers at this time. If you will be using the removed soil to fill the hole, add about a 1:4 ratio of compost or another amendment (amendment link) to the soil.
- Deeply water the plants the day before you plan to dig them. Never leave the roots exposed to sun, heat or wind.
- Water again immediately before lifting them.
- Place the plant in the hole; fill halfway with amended soil and water again. Allow the water to settle the soil, fill the hole and lightly tamp the soil with your hands to close any air pockets.
- Water once again.
- Provide some shade to shield the plant from direct sunlight for three to five days, a board or flattened cardboard box will do.
- Check plants daily for two weeks; they will likely need water daily for the first week. Often you can slow the watering in week two. Check the soil a few inches below the surface for dryness – stick your finger about two inches into the soil; it should feel moist or stick to your finger. Water immediately if the plant is wilting.
 Jean Lovell, long-time Resource Central volunteer and former master gardener, tackles your gardening questions!
Submit your question(s) to: GardenInfo@ResourceCentral.org